1. Introducing GEE and Geemap#
1.1. Introduction#
Google Earth Engine is a widely used cloud-computing platform in the geospatial community. It features a multi-petabyte data catalog of satellite imagery and geospatial datasets, enabling users to easily and efficiently visualize, manipulate, and analyze geospatial data. Built upon the Earth Engine Python API and open-source mapping libraries, geemap makes it much easier to analyze and visualize Earth Engine datasets in a Jupyter environment. Since its initial release in April 2020, geemap has become the most popular Python package for interactive analysis and visualization of Earth Engine data.
This chapter covers the fundamentals of Geospatial Data Science, Google Earth Engine, and geemap. We will walk through the process of setting up a conda environment and installing geemap. Additionally, we will explore how to utilize geemap with Google Colab without needing to install anything on your device. Finally, we will provide some useful resources for further learning about Earth Engine and geemap beyond the scope of this book.
1.2. What is Geospatial Data Science#
Before introducing geospatial data science, we need to understand what data science is. The term “data science” has gained a lot of attention during the past decade, along with related terms such as big data, data analytics, and machine learning. According to Google Trends, the online search interest over time in “data science” has experienced a rapid increase since 2016 (see Fig. 1.1). When we googled “data science”, 4.1 billion records were returned, compared to 7.6 billion on “big data”, 2.6 billion on “machine learning”, and 1.9 billion on “data analytics”. Interestingly, the interest in “big data” has been decreasing since 2018, while the interests in “data science” and “machine learning” continue to increase.
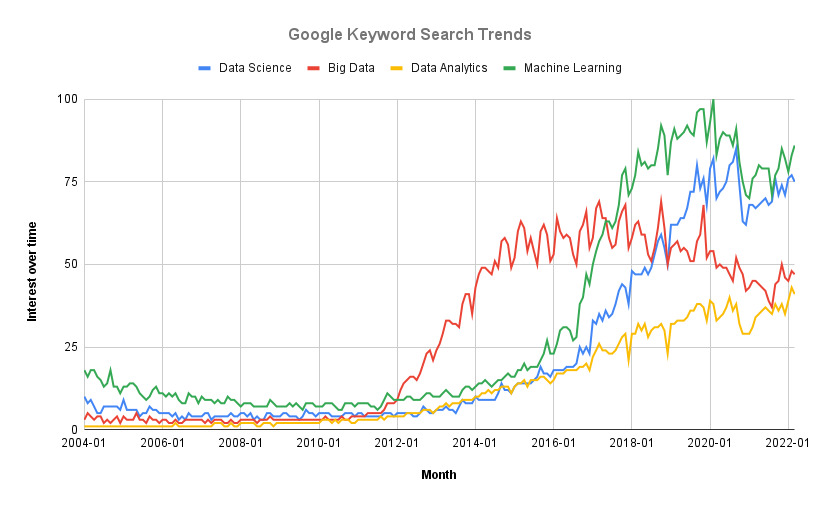
Fig. 1.1 Online search interest trends on data science-related keywords by Google as of March 28, 2022. The numbers on the vertical axis represent search interest relative to the highest point on the chart for the given region (worldwide) and time (2004-2022). A value of 100 is the peak popularity for the term. A value of 50 means that the term is half as popular. A score of 0 means there was not enough data for this term.#
Okay, so what is data science? Data science is a broad term that encompasses many areas of interest. From a high-level perspective, data science is the science of data or the study of data [Cao, 2017]. From the disciplinary perspective, data science is an interdisciplinary field that uses scientific methods, processes, algorithms, and systems to extract knowledge and insights from noisy, structured and unstructured data, and apply knowledge and actionable insights from data across a broad range of application domains [Dhar, 2013].
Geospatial data science is a discipline within data science that specifically focuses on the spatial component of data. It brings forth theories, concepts and applications that are specific to geographic data in the realm of data science [Hassan, 2019]. A good example of geospatial data science is NOAA’s analysis of spatial and temporal datasets (e.g., satellite imagery, weather data, and climate models) to provide hurricane forecasts using statistics, machine learning, and mathematical models [Eftelioglu et al., 2017].
1.3. What is Google Earth Engine#
Google Earth Engine (GEE) is a cloud computing platform with a multi-petabyte data catalog of satellite imagery and geospatial datasets [Gorelick et al., 2017]. During the past few years, GEE has become very popular in the geospatial community, and it has empowered numerous environmental applications at local, regional, and global scales [Amani et al., 2020, Boothroyd et al., 2020, Tamiminia et al., 2020, Wu et al., 2019]. Since GEE became publicly available in 2010, there has been an exponential growth in the number of peer-reviewed journal publications empowered by GEE (see Fig. 1.2). Based on the most recent bibliometric analysis, there are 1,077 peer-reviewed journal publications with the word “Google Earth Engine” in the title and 2,969 publications with the word “Google Earth Engine” in either the title or abstract. In 2022, the number of publications with “Google Earth Engine” in the title or abstract reached 1,150, which is more than a 280-fold increase from the year 2014 with only 4 publications.
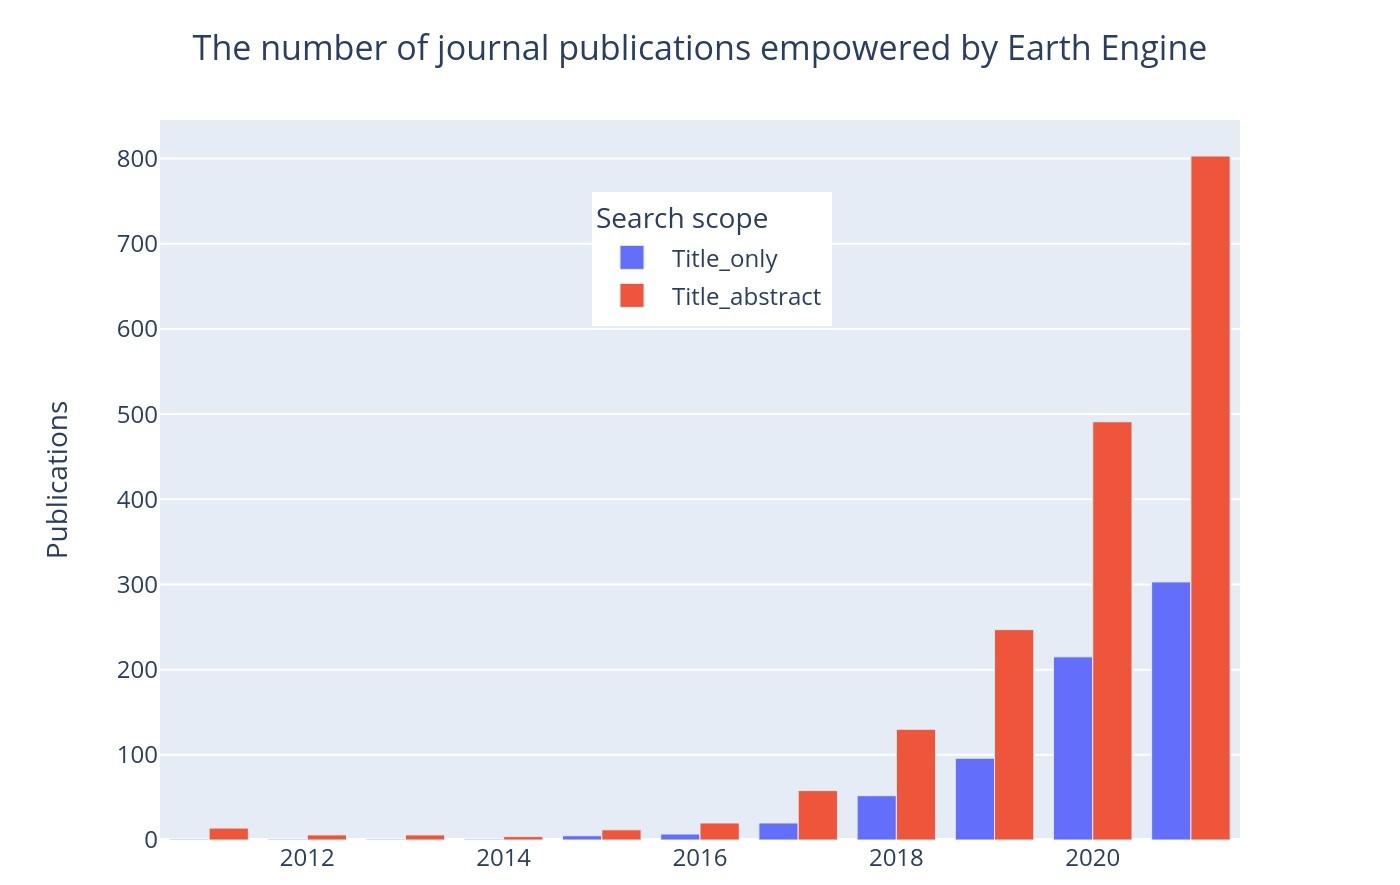
Fig. 1.2 The number of journal publications empowered by Google Earth Engine.#
To use Earth Engine, you must first sign up for an Earth Engine account (Fig. 1.3). You cannot use Google Earth Engine unless your application has been approved. Once you receive the application approval email, you can log in to the Earth Engine JavaScript Code Editor to get familiar with the JavaScript API.

Fig. 1.3 Signing up for an Earth Engine account.#
1.4. What is geemap#
GEE provides users with both JavaScript and Python APIs for making computational requests to the Earth Engine servers. While the GEE JavaScript API has robust documentation and an interactive IDE (i.e., GEE JavaScript Code Editor), the GEE Python API has relatively limited functionality for visualizing results interactively, and there is a lack of documentation. The geemap Python package was created to fill this gap [Wu, 2020]. It is built upon a number of open-source Python libraries, such as the earthengine-api, folium, ipyleaflet, and ipywidgets packages. Geemap enables users to analyze and visualize Earth Engine datasets interactively within a Jupyter environment with minimal coding (see Fig. 1.4).
Geemap is intended for students and researchers who would like to utilize the Python ecosystem of diverse libraries and tools to explore Google Earth Engine. It is also designed for existing GEE users who would like to transition from the GEE JavaScript API to the Python API. Geemap provides an interactive graphical user interface for converting GEE JavaScript projects to Python scripts without coding. It can save users a lot of time and effort by providing a simple interface for exploring and visualizing Earth Engine datasets.
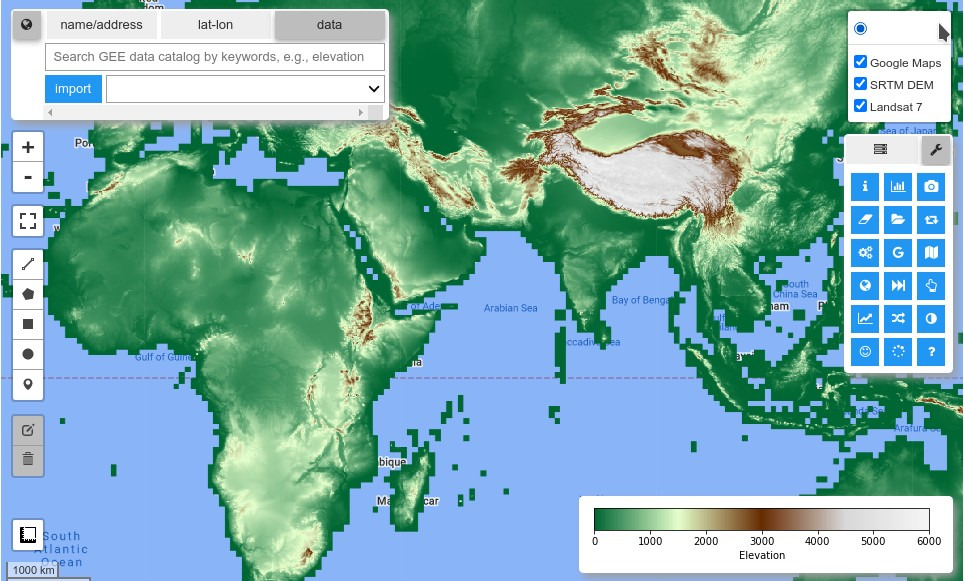
Fig. 1.4 The geemap graphical user interface built upon ipyleaflet and ipywidgets.#
1.5. Installing geemap#
The geemap package has some optional dependencies, such as GeoPandas and localtileserver. These optional dependencies can sometimes be a challenge to install, especially on Windows. Therefore, we advise you to closely follow the recommendations below to avoid installation problems. Note that installing geemap will automatically install all of its dependencies, including the earthengine-api package. Therefore, you do not need to install the earthengine-api package separately.
1.5.1. Installing with conda#
To install geemap and its dependencies, we recommend you use the conda package and environment manager. This can be obtained by installing the Anaconda Distribution (a free Python distribution for data science), or through Miniconda (minimal distribution only containing Python and the conda package manager). Also see the installation docs for more information on how to install Anaconda or Miniconda locally.
Geemap is available on the conda-forge Anaconda channel, a community effort that provides conda packages for a wide range of software. Creating a new conda environment to install geemap is not strictly necessary, but given that some geemap dependencies might have a version conflict with other geospatial packages in an existing conda environment, it is a good practice to start fresh by installing geemap and its dependencies in a clean environment for your project. The following commands create a new conda environment named gee and install geemap in it:
conda create -n gee python
conda activate gee
conda install -c conda-forge geemap
First, open the Anaconda Prompt or Terminal and type “conda create -n gee python”. Press Enter to create a new conda environment named gee (see Fig. 1.5).
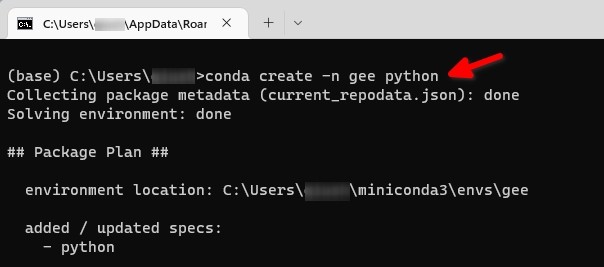
Fig. 1.5 Creating a new conda environment named gee.#
Next, activate the new conda environment by typing “conda activate gee” and press Enter. Then, install geemap into the environment we just activated by typing “conda install -c conda-forge geemap” and press Enter (see Fig. 1.6).
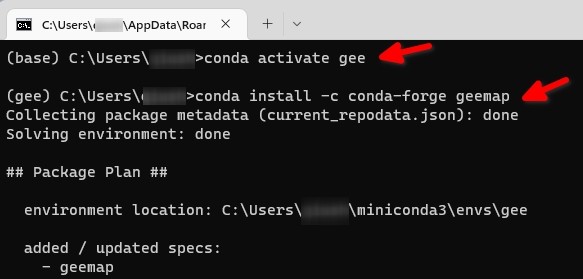
Fig. 1.6 Activating the new conda environment and installing geemap.#
Geemap has a list of optional dependencies specified in the requirements_all.txt, such as GeoPandas, localtileserver, osmnx, rioxarray and rio-cogeo. It can be a bit cumbersome to install these optional dependencies individually, but luckily these optional dependencies are available through the pygis Python package which can be installed with a single command.
Since pygis has many dependencies, it might take a while for conda to resolve dependencies. Therefore, we highly recommend you to install Mamba, a fast, robust, and cross-platform package manager. Mamba is a re-write of conda that significantly increases the speed of resolving and installing packages. It runs on Windows, macOS, and Linux, and is fully compatible with conda packages and supports most of conda’s commands. The following commands install Mamba and pygis:
conda install -c conda-forge mamba
mamba install -c conda-forge pygis
To install Mamba, type “conda install -c conda-forge mamba” and press Enter (see Fig. 1.7).
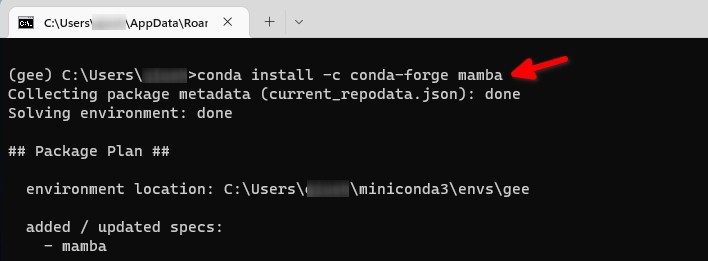
Fig. 1.7 Installing the Mamba package manager.#
Once Mamba is installed in a conda environment, you can then simply replace any conda command with mamba. For example, to install pygis, type “mamba install -c conda-forge pygis” and press Enter (see Fig. 1.8).
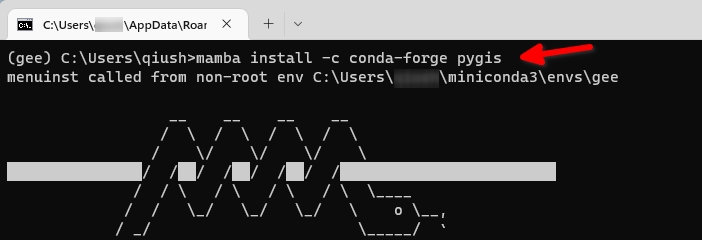
Fig. 1.8 Installing optional dependencies of geemap through the pygis package.#
Congratulations! You have successfully installed geemap and its dependencies. We will dive into geemap in the next chapter.
1.5.2. Installing with pip#
Geemap is also available on PyPI. It can be installed with pip using the following command:
pip install geemap
All optional dependencies of geemap are listed in requirements_all.txt, which can be installed using one of the following:
pip install geemap[extra]: installing extra optional dependencies listed in requirements_extra.txt.pip install geemap[all]: installing all optional dependencies listed in requirements_all.txt.pip install geemap[backends]: installing keplergl, pydeck, and plotly.pip install geemap[lidar]: installing ipygany, ipyvtklink, laspy, panel, pyntcloud[LAS], pyvista, pyvista-xarray, and rioxarray.pip install geemap[raster]: installing geedim, localtileserver, rio-cogeo, rioxarray, netcdf4, and pyvista-xarray.pip install geemap[sql]: installing psycopg2 and sqlalchemy.pip install geemap[apps]: installing gradio, streamlit-folium, and voilapip install geemap[vector]: installing geopandas and osmnx.
1.5.3. Installing from source#
You may install the latest development version by cloning the GitHub repository with Git and using pip to install from the local directory:
git clone https://github.com/gee-community/geemap
cd geemap
pip install .
It is also possible to install the latest development version directly from the GitHub repository with:
pip install git+https://github.com/gee-community/geemap
1.5.4. Upgrading geemap#
If you have installed geemap before and want to upgrade to the latest version, you can run the following command in your terminal:
pip install -U geemap
If you use conda, you can update geemap to the latest version by running the following command in your terminal:
conda update -c conda-forge geemap
To install the development version from GitHub directly within a Jupyter notebook without using Git, run the following code in a Jupyter notebook and restart the kernel to take effect:
import geemap

geemap.update_package()
1.5.5. Using Docker#
Geemap is also available on Docker Hub.
To use geemap in a Docker container, you first need to install Docker. Once Docker is installed, you can pull the latest geemap image from Docker Hub by running the following command in your terminal:
docker run -it -p 8888:8888 giswqs/geemap:latest
1.6. Creating a Jupyter notebook#
Let’s activate the conda environment created in the previous section:
conda activate gee
Next, launch JupyterLab by typing the following commands in the Terminal or Anaconda Prompt:
jupyter lab
JupyterLab will open as a new tab in the browser. Click the Python 3 icon in the top left corner of the JupyterLab Launcher window (see Fig. 1.9) or go to File -> New -> Notebook to create a new notebook. Select the newly created notebook in the JupyterLab File Browser tab and press F2 to rename the notebook, e.g., chapter01.ipynb.

Fig. 1.9 The JupyterLab user interface.#
Jupyter notebook has two modes: Edit mode and Command mode. The Edit mode allows you to type into the cells like a normal text editor. The Command mode allows you to edit the notebook as a whole, but not type into individual cells. Jupyter notebook has many keyboard shortcuts [Yordanov, 2017]. Here are some commonly used shortcuts. Note that the shortcuts are for Windows and Linux users. For Mac users, replace Ctrl with Command.
Shortcuts in both modes:
Shift + Enter: run the current cell, select belowCtrl + Enter: run selected cellsAlt + Enter: run the current cell, insert belowCtrl + S: save and checkpoint
While in command mode (press Esc to activate):
A: insert cell aboveB: insert cell belowX: cut selected cellsC: copy selected cellsV: paste cells belowY: change the cell type to CodeM: change the cell type to MarkdownP: open the command palette
While in edit mode (press Enter to activate):
Esc: activate the command modeTab: code completion or indentShift + Tab: show tooltip
1.7. Earth Engine authentication#
You need to authenticate Earth Engine before using it. The package for the Earth Engine Python API is called earthengine-api, which should have been automatically installed by the geemap package as described in Section 1.5. Enter the following script into a code cell of a Jupyter notebook and press Shift + Enter to execute:
import ee

ee.Authenticate()
After running the above script, a new tab will open in the browser asking you to sign in to your Earth Engine account. After signing in, you will be asked to authorize the Google Earth Engine Authenticator. If this is the first time you are authenticating Earth Engine, click CHOOSE PROJECT to select a Cloud Project to use for Earth Engine (see Fig. 1.10).
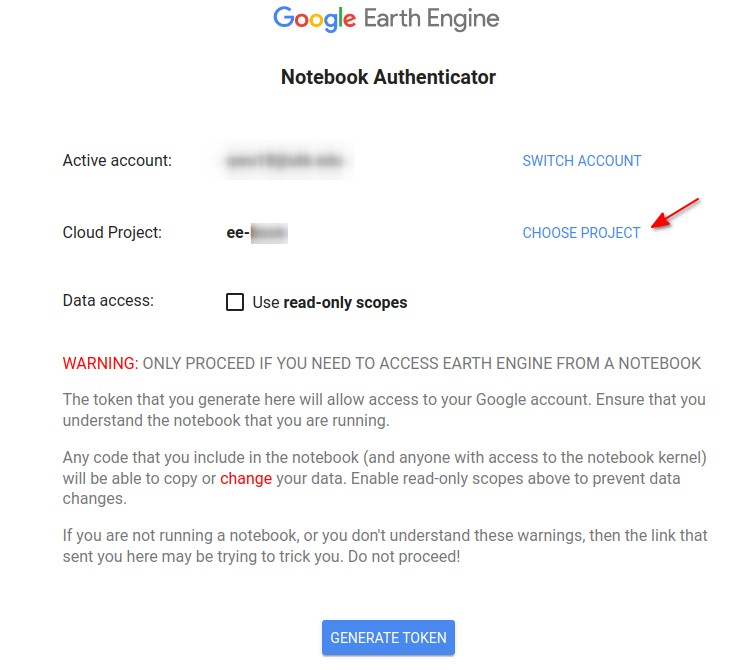
Fig. 1.10 Earth Engine Notebook Authenticator.#
You can either choose an existing Cloud Project or create a new one. If you choose to create a new Cloud Project, enter a project name, e.g., ee-your-username and click the blue SELECT button to create a new Cloud Project. If a red warning message appears at the bottom of the page, click on the Cloud Terms of Service link to accept the terms of service and then click the SELECT button again (see Fig. 1.11).
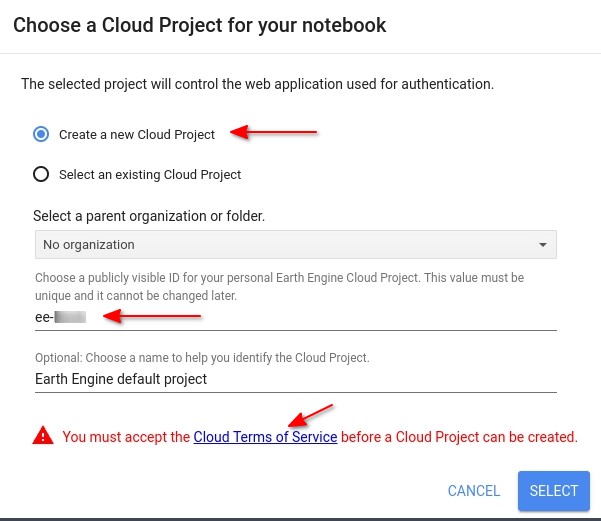
Fig. 1.11 Creating a new Cloud Project.#
After selecting a Cloud Project, click the GENERATE TOKEN button to generate a new token. You will be asked to choose your Earth Engine account for the Notebook Client (see Fig. 1.12).
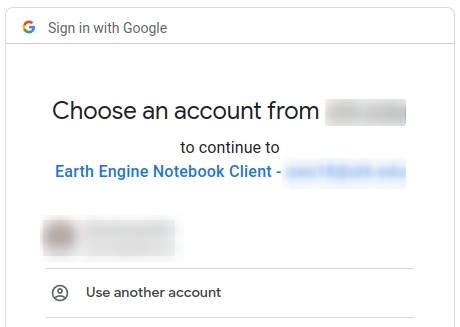
Fig. 1.12 Choosing an account for the Earth Engine Notebook Client.#
Click the Allow button to allow the Notebook Client to access your Earth Engine account (see Fig. 1.13).
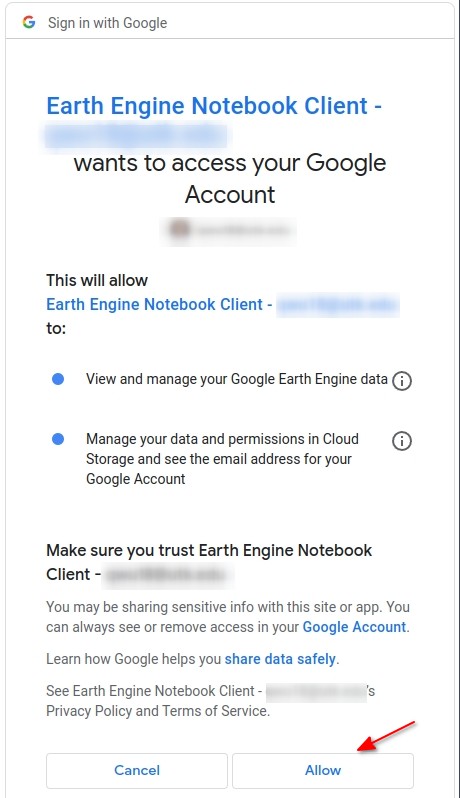
Fig. 1.13 Choosing an account for the Earth Engine Notebook Client.#
An authentication code will be generated and displayed on the page. Copy the authorization code and paste it into the notebook cell asking for the verification code. Press Enter and the Successfully saved authorization token message should appear beneath the authorization code you entered (see Fig. 1.14).
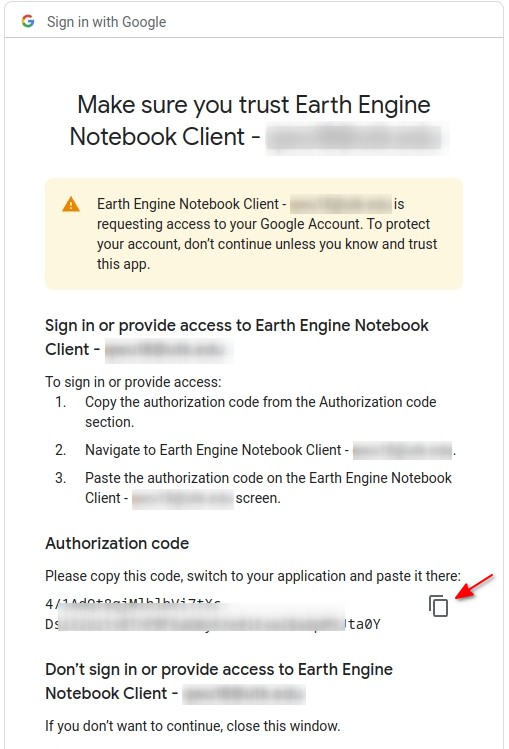
Fig. 1.14 Copying the authentication code.#
Congratulations! You have successfully authenticated Earth Engine for use in your Jupyter notebook. In general, authentication for local installations is a one-time step that generates a persistent authorization token stored on a local computer. The token can be found in the following file path depending on your operating system. Note that you might need to show the hidden directories on your computer in order to see the .config folder under the home directory.
Windows: C:\\Users\\USERNAME\\.config\\earthengine\\credentials
Linux: /home/USERNAME/.config/earthengine/credentials
MacOS: /Users/USERNAME/.config/earthengine/credentials
Once Earth Engine is authenticated, you can run the following script to initialize Earth Engine for a new Python session.
ee.Initialize()
In general, you will need to initialize Earth Engine for each new Python session, i.e., whenever you open a Jupyter notebook or Python script and want to use Earth Engine. Fortunately, geemap can automatically initialize Earth Engine for you when creating an interactive map, which will be covered in the next chapter. In other words, you rarely need to run ee.Initialize() explicitly.
1.8. Using Google Colab#
If you have difficulties installing geemap on your computer, you can try out geemap with Google Colab without installing anything on your machine. Google Colab is a free Jupyter notebook environment that runs entirely in the cloud. Most importantly, it does not require a setup and the notebooks that you create can be simultaneously edited by your team members - just like the way you edit documents in Google Docs!
Click 01_introduction.ipynb to launch the notebook in Google Colab.
Next, press Ctrl + / to uncomment the following line to install geemap:
# %pip install geemap
After geemap has been installed successfully, type the following code in a new cell:
import geemap

Map = geemap.Map()
Map
Follow the on-screen instructions to authenticate Earth Engine. After that, you should be able to see the interactive map displayed beneath the code cell (see Fig. 1.15).
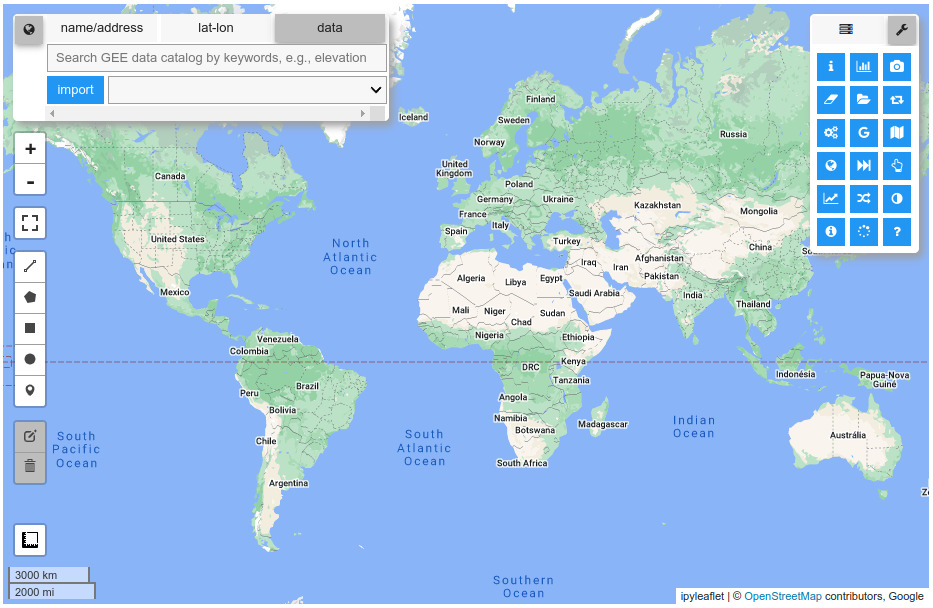
Fig. 1.15 The interactive map displayed in Google Colab.#
1.9. Using geemap with a VPN#
When using geemap through a VPN, it’s important to use “geemap.set_proxy(port=your-port-number)” to connect to Earth Engine servers (Fig. 1.16). Failure to do so may result in a connection timeout issue.
import geemap

geemap.set_proxy(port='your-port-number')
Map = geemap.Map()
Map
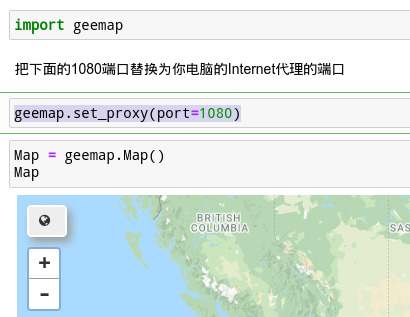
Fig. 1.16 Using geemap with a VPN.#
1.10. Key features of geemap#
Below is a partial list of geemap features. Please check the geemap API Reference and tutorials for more details.
Convert Earth Engine JavaScript projects to Python scripts and Jupyter notebooks.
Display Earth Engine data layers on interactive maps.
Support Earth Engine JavaScript API-styled functions in Python, such as Map.addLayer(), Map.setCenter(), Map.centerObject(), Map.setOptions().
Visualize Earth Engine vector and raster data without coding.
Retrieve Earth Engine data interactively using the Inspector tool.
Creating interactive plots from Earth Engine data by simply clicking on the map.
Convert data between the GeoJSON and Earth Engine FeatureCollection formats.
Use drawing tools to interact with Earth Engine data.
Use shapefiles with Earth Engine without having to upload data to one’s GEE account.
Export data in the Earth Engine FeatureCollection format to other formats (i.e., shp, csv, json, kml, kmz).
Export Earth Engine Image and ImageCollection as GeoTIFF.
Extract pixels from an Earth Engine Image into a 3D numpy array.
Calculate zonal statistics by group.
Add a custom legend for Earth Engine data.
Convert Earth Engine JavaScript projects to Python code from directly within a Jupyter notebook.
Add animated text to GIF images generated from Earth Engine data.
Add colorbar and images to GIF animations generated from Earth Engine data.
Create satellite timelapse animations with animated text using Earth Engine.
Search places and datasets from Earth Engine Data Catalog.
Use the timeseries inspector to visualize landscape changes over time.
Export Earth Engine maps as HTML files and PNG images.
Search Earth Engine API documentation within Jupyter notebooks.
Import Earth Engine assets from personal Earth Engine accounts.
Publish interactive GEE maps directly within a Jupyter notebook.
Add local raster datasets (e.g., GeoTIFF) to the map.
Support Cloud Optimized GeoTIFF (COG) and SpatioTemporal Asset Catalog (STAC).
Perform image classification and accuracy assessment.
Extract pixel values interactively and export data as shapefile and CSV.
Visualize land cover change with Sankey diagrams.
Load vector data from a PostGIS server.
Create publication-quality maps with cartoee.
1.11. Summary#
In this chapter, we began by covering the fundamentals of Geospatial Data Science, Google Earth Engine, and geemap. We then provided guidance on setting up a conda environment for installing geemap and its dependencies. Additionally, we walked through the process of using geemap with Google Colab as a cloud-based alternative to a local installation.
By now, you should have a fully functional conda environment that is ready for working with Earth Engine and geemap. In our next chapter, we will explore geemap in greater depth.